This is the second in a series of posts about the transition from a monolith to microservices that I led at Shapeways as the Vice President of Architecture. I hope you find it useful! You can find the series index here.
The Times They Were a Changin'
When we made the decision to transition to microservices, I was the VP of Engineering at Shapeways - effectively, the head of technology in the company. My job was largely strategic and managerial - with a team of 30 with broad focuses and a director tier, the majority of my time was spent in planning with the executive team and working on strategy with the directors, with very little time spent developing software. I loved having a hand in setting the direction of our business, and in working to coordinate technology work across the product, operations, commercial, and marketing organizations, but I was starting to miss what got me into software in the first place: building things that make customers smile.
Once we decided our to make the switch to microservices, the next step was to find someone to head up the transition. This person would be responsible for delivering the transition to microservices in a way that fit our business, attempting to maximize the gains of development velocity, system flexibility, and business scalability while minimizing disruption to the core business. This person would need to have a strong understanding of Shapeways’ current business model, its strengths and weaknesses, and a solid understanding of where our new strategy was going to take us. After some thinking about where I could add the most value for Shapeways, as well as conversations with our CEO and Chief Product Officer, I decided that I wanted to give it a shot.
This may seem like a strange choice. “Why would someone who’s effectively running technology at a startup give it up to be an IC again?” Well, there were two reasons
We (the CPO and myself) had built tier of Directors of Engineering under me who were effectively running their areas (Application Development, Systems Engineering, and 3D Technologies, requiring little day-to-day guidance and interaction from me.
I had been in the VP Engineering role for almost 5 years, and was ready to mix it up and get my hands dirty with the ins and outs of software again.
In terms of the first reason - the organization almost didn’t need a VP of Engineering any longer. We had hired a Chief Product Officer to run Product and Tech, and I reported into him. This was great - he was stronger in product than in tech, so I was effectively his liaison to the technology org while he focused on building the product org he envisioned at Shapeways. In terms of the org beneath me, I am super proud to have worked alongside strong engineering leaders who had either grown into or been hired into Director of Engineering positions. These folks were (and still are) strong, capable, empathetic engineering leaders who were running their orgs without a ton of help from me. That’s awesome - that’s exactly what a Director of Engineering SHOULD be doing.
Now, with a capable leader above, and a solid trio of capable leaders beneath, I felt that I was less impactful in the VP Engineering role than I could be elsewhere. This was acknowledged by leadership - I had already been having conversations with the CPO/CEO around potential roles for me once the CPO had found his footing in the org. I really appreciate the ability to have had these open, honest conversations with leaders in my organization: it’s a privilege not always afforded by executive teams, and the trust that’s built by having them helped get us to a place where both Shapeways and myself would be happy and fulfilled.
In terms of my own personal desire to be more hands-on: this is a story that’s repeated once before in my career. I joined Shapeways in 2012, as a software engineer. Prior to that, I’d had what was effectively and engineering management position in the finance sector, coordinating a global team of software engineering to support an internal product we had built at the Firm. I was tired of management, and wanted to get my hands on again - so I did. I joined a small startup in NYC doing what I knew best at the time - bringing a devops mindset with automated testing, release management, and production monitoring to a team that needed it.
Over the months from my start date, I hired a small team of engineers to help. When our systems engineering team lead left, I took over his team. Then, when our VP of Engineering left in 2014, I was tapped by our then-CEO to step into the role. So, left management, went back to IC, and found myself back on the management track shortly thereafter. However, during that time, I had the chance to do a few things.
Prove to myself that I could still add value to a team, and deliver production-ready software. It’s an easy thing to talk about engineering when you’re not the one doing it every day - it’s another thing entirely to do it. I missed the work, and count myself fortunate to have had the opportunity to get back to it. And, seeing the value that my experience added to the codebase in terms of reliability and stability gave me a real sense of pride in the work we were doing.
Build empathy for software developers, and for their managers. Doing the same work as the people you manage builds empathy for your team. Furthermore, being a former manager who is now being managed gives you empathy for your manager! I’ve always approached management from a coaching perspective - I want us to win together. My best days as a manager were when the team would come together as a cohesive unit, solving problems, shipping software, and celebrating our successes. That doesn’t happen overnight - it requires trust, empathy, and an investment in the success of the team over your own personal successes.
Deliver the most value I could to the company I was joining. When I joined Shapeways, we didn’t need another manager - we needed stability, reliability, and confidence in the software we were building. Delivering those things was far more valuable than any management oversight I could have provided at that time. Having the ability to get things done from both the management and the IC seats is a great ace up the sleeve of anyone working in technology.
So, with those two benefits in mind, I started to think about my next role at Shapeways. Given that I’d been at the company for 6 years, I had a really strong understanding of our business and codebase, and knew where all the proverbial bodies were buried in both. I knew where we had been, where we were, and where we were headed, and was excited to dive back into the details and get us there. We all agreed - I would transition from VP Engineering to VP Architecture, and immediately begin working on the future of Shapeways’ technology.
This is the first in a series of posts about the transition from a monolith to microservices that I led at Shapeways as the Vice President of Architecture. This series will dig into the decision process around making the switch, selling it to the executive team, getting the organization on board, planning for success, and executing the change. I hope you find it useful! You can find the series index here.
In the fall of 2018, Shapeways decided that we were going to take our business in a new direction.. We wanted to expand from being a 3D Printing service bureau to being a technology platform, connecting business, consumers, and industries through our global supply chain and production facilities. As we weren’t yet sure exactly what group of products and features would be valuable to our future customers, we wanted to be able to test things quickly, built out simple MVPs to validate, and be comfortable tossing aside products that didn’t fit the bill.
With this goal in mind, we looked to our current technology offering…and found it not up to the task. The application powering Shapeways.com and Inshape (our in-house ERP system) was built in 2010 as a monolithic PHP application. It had carried us dutilfy for 8 years, but it was showing its age. It was written using a custom PHP framework that had built up some rust over the years, and it showed. While reliability and uptime were fine, our site performance was below industry standards, and (perhaps more importantly) it was very difficult to develop new features at speed.
A Code Review Session with our Monolith
This wasn’t going to work for our new direction. However, we did have two advantages in our existing monolith
The business logic to run our internal model processing, order production, and customer management was sound, robust, and performant compared to the rest of the system
We had built a REST API into the monolith to enable our customers to add 3D printing to their own apps and websites. This API had been active since 2013, and was in regular use by some of our largest customers.
This API exposed all the key features required by our core business, was robust and reliable, and provided us with an effective (if not optimal) interface to our complex business logic. This meant that we could effectively draw a black box around the majority of the existing platform, and iterate on top of it, while continuing to improve the original in a separate workstream.
Once we knew that we had a solid foundation to build on, we began exploring different potential architectures to fit our business needs. Given the desires for speed of iteration, ability to test new functionality quickly for a variety of customers, and the assumption that these customers would have very different needs, we determined we needed an architecture that would lend itself to composability, reuse, and fast scalability. When combined with the fact that we already had an API providing a clean interface to the model upload and purchase functionality of Shapeways, and that the microservices community and ecosystem is mature and robust, a microservice architecture emerged as a clear path forward for us.
The next post in this series will elaborate on the choice of a microservices architecture, including business needs, pros and cons, organizational structuring, and the final decision process.
A decade or two ago, getting a custom part manufactured required you to have your own workshop or to make a visit to a factory floor. Today, you can create your own 3D model, upload it to a website, and have a functional product delivered to your door within a few days—a turn around time unimaginable just 20 years ago.
While most news about the 3D printing industry focuses on advancement in hardware and materials, software has played a crucial role in the democratization of 3D printing. Companies like Shapeways have delivered software to generate 3D files, prepare and optimize them for printing, and manufacture and distribute.
Shapeways’ primary technology offerings can split into two categories—the ability to upload, repair, price, and purchase 3D models in a variety of materials, and back-end systems driving the manufacturing, distribution, and fulfillment of our orders at a global scale. I’m going to discuss three distinct pieces of software that occur in separate steps in the buying process: one that help customers upload designs and make purchases: Model Processing; one that securely shows the customer the final printable model: ShapeJS; and one that helps us manufacture, distribute, and fulfill those design purchases: Inshape.
Processing Customer Models
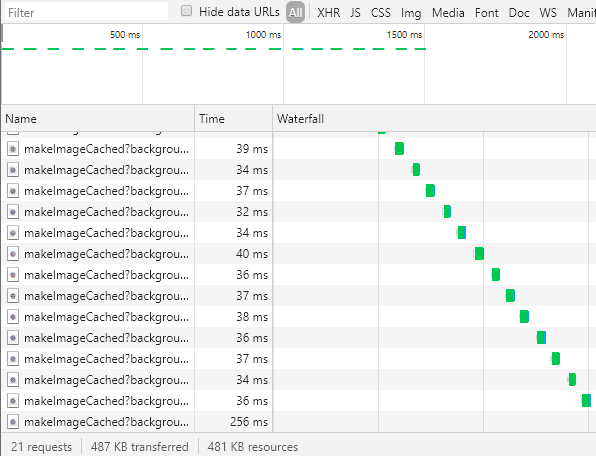
Our first contact with a customer’s order is when they upload a 3D model. We have no control over the quality and printability of the model, so our software repairs errors during model generation where it can and analyzes their printability in a wide variety of materials. This is a very compute-heavy process—we calculate the model surface area and volume, determine the number of parts that the model is composed of, and examine the model for errors and attempt to repair them, all within a mean time of 25 seconds.
In order to deliver these results, we needed to build a system that leverages parallelism and provides easy scalability to handle fluctuations in load without breaking our SLA. To start, we decided to build individual services that are each responsible for evaluating different components of printability. These services fall into three categories: model validation, model pricing calculation, and model repair.
Model validation services are charged with validating that the model can be printed in the first place. These checks make sure that the file is valid, that we can process it, and that the model is manifold—water-tight. Pricing calculation services are responsible for generating pricing components of our models, including but not limited to volume, part count, and surface area. Finally, fixing services help us repair our customer models and ensure that they’re printable. This includes steps like repairing meshes, decimating models to reduce triangle counts, and fixing inverted matrices on the model.
Some of these services generate new files to facilitate printing, production, or image display on our site. These services are mostly implemented in Java (the language of choice for our 3D tools team), though some have been re-implemented in CUDA to run directly on GPUs for improved performance.
Once we implemented these services, we had to string them together into what we call a Model Processing Pipeline. This pipeline is a chain of the services described above that takes in a 3D file at the start and outputs a fully priced, printable, rendered 3D Model on Shapeways.com. We defined these pipelines in another service called the Director, which is effectively a directed acyclic graph of model processing services.
To ensure that our services remain available at all times, we needed another layer to manage traffic. So rather than pointing directly to the services themselves, these steps indicate ActiveMQ queues, which act as load balancers for a pool of services that can handle a pipeline step. Using ActiveMQ in this fashion allows us to run our services anywhere in our hybrid cloud, as well as to scale at the service level rather than the pipeline level. Need more mesh repair compute in Europe? Spin up more instances in either our data center or AWS and subscribe them to the queue. With this capability, we’re able to optimize our model processing compute power for both user experience and cost, providing a best-of-both-worlds experience for Shapeways and our customer base.
Secure Real-Time Rendering
Once we’ve got a printable model, we have to actually display it to the user in 3D for their review. Our uploaders have a chance to perform a visual review of key geometry components to be sure that our repair process didn’t alter the model. To assist with this review, we provide visualizations to help users understand potential problem areas with their models, such as thin walls or unintentionally connected parts. These visualizations are rendered directly on the users own computer graphics card, ensuring fast and reliable performance as they review their files.
Visualizing the customer’s own model is easy enough; they own the model, so they can render it on their system. But in addition to the online 3D printing service, Shapeways also provides a marketplace for our uploaders to open a shop and sell prints of their models. Our customers purchasing from our uploaders want to see a three-dimensional view of the models that they’re thinking about purchasing.
Here’s where the problem occurs—the industry-standard visualizations rendered on the consumers computer require us to transmit the entirety of the model file data to that users video card via WebGL. Bad actors can easily lift this 3D file from their own graphics cards, thereby stealing the model from the original uploader without paying for it, a massive violation of their IP rights. Shapeways takes the IP rights of all of our customers extremely seriously, so even the possibility of this edge case was deemed too risky to let stand. Therefore, we decided to build our own IP-safe 3D viewer to allow customers to view parts in 3D.
Enter ShapeJS. ShapeJS is a JavaScript-based tool we created to generate and display 3D geometry in real-time on the user’s browser. We created ShapeJS as a research project—could we create a web-based, voxel-backed, IP-safe, 3D design interface for developers as opposed to for those with background in 3D modeling? The back end of ShapeJS is built entirely in CUDA and runs directly on a server GPU for high-performance rendering.
ShapeJS is a parametric design tool, which means that you describe the geometry you want to create in code, and the tool converts this into printable 3D geometry. For example, here’s a simple ShapeJS function to create a gyroid extruded through a sphere.
These first three lines define two pieces of geometry: a sphere of radius 25mm and a gyroid with period and thickness defined by user-provided arguments.
These four lines create a boolean intersection, set a blending radius to define how sharply the objects intersect each other (think photoshop blur tool), and then add both our sphere and our gyroid to the intersection. This effectively creates the sphere, then removes from it the area defined by the gyroid.
These final two lines create a ShapeJS Scene, which describes the visual render that will be returned to the ShapeJS interpreter for display. This scene is 52 milimeters wide, and contains the intersection of the sphere and the gyroid right in the middle. Running this function in the ShapeJS IDE will result in a nice, posable gyroid. You can play around with this here. There are other features such as configuring the UX that you’ll see in the code, but I omitted them for brevity.
A Gyroid via ShapeJS
Now, let’s talk about IP safety. The crux of the issue is this: so long as we’re sending the actual 3D model file over the internet to the customer, we’re putting the model owner’s IP at risk. ShapeJS doesn’t work this way. Rather, what ShapeJS does is connect directly to a Shapeways-owned graphics card, where scripts interpret the model, and their results are returned to the user. The results, in this case, are 2D images of the portion of the 3D model that is visible in the scene. When the user interacts with the scene, the GPU renders the new “view” from the users perspective and streams it to their browser. This happens quite quickly and creates an animation that gives the end user the impression that they’re manipulating a 3D model in their browser. Here’s what those back end calls look like:
Streaming Graphics Modeling Animation
Managing the 3D Printing Infrastructure
Everything described up to this point is focused at the consumer-facing portion of Shapeways. However, we’re more than a website—Shapeways has two 3D printing facilities running around 80 machines in total, a supply chain network of over 70 production partners for overflow and special materials, and a global distribution footprint. We process over 10,000 individual (and often unique) parts through our system on a daily basis. In order to coordinate all of this activity, we’ve built an Enterprise Resource Planning (or ERP) tool, Inshape, from the ground-up, focused on the unique challenges presented by 3D printing.
ERPs are nothing new. Companies like Netsuite (now Oracle), SAP, Siemens, and more have been providing ERP software since the mid 90s. However, these solutions are aimed at traditional business—high-value individual customers purchasing large quantities of parts from a finite catalog of available offerings. For example, consider Ford Motor Company. They’ve got a set number of vehicles, each with a set bill of materials. When they need replacement headlamps from their provider, they know exactly what they’re buying, how much it costs, and who to pay for it.
Compare this to Shapeways: we have a large number of retail (implicity low-value, when compared to enterprises) customers, purchasing small quantities from a theoretically infinite catalogue of available offerings (something like 50% of what’s ordered on Shapeways on any given day is being ordered for the very first time). The available offerings just didn’t fit with our business needs. So if you can’t buy them, build them.
Inshape is a web-based ERP, designed with the goal of shepherding our customer orders from placement to shipment quickly, reliably, and at a high level of quality. Under the hood, Inshape is a collection of tools and services built to meet our goals, including up-to-the-second part tracking, workflow planning, quality monitoring, machine interfaces, and shipping provider integrations. I’ll speak specifically about two technically interesting features of Inshape: build planning and equipment monitoring
When most people think of a 3D printer, the first image that pops into mind is something like a makerbot: a desktop printer that produces a single part at a time. At Shapeways, we’re using industrial 3D printers capable of producing up to 1000 parts at once. In order to use our machines as efficiently as possible, we need to get as many of our current backlog of parts into a printer as we safely can on every single build. This is what’s known in computer science as a Packing Problem. Where we differ from the norm is that we’re not packing known objects; we’re packing a unique set of parts that varies every single time we need to pack a job.
To solve this problem, we’ve built our own, in-house packing solution. We combine the knowledge we have about our customer lead times, specific geometries in our pipeline, known capabilities of our individual printers, and years of experience manufacturing parts into a service which autonomously and iteratively packs jobs for production. We’ve been able to almost double the industry standard of job density though this system, resulting in shorter lead times for our customers and more throughput for our factories.
Tray Packing with Shapeways PLAN
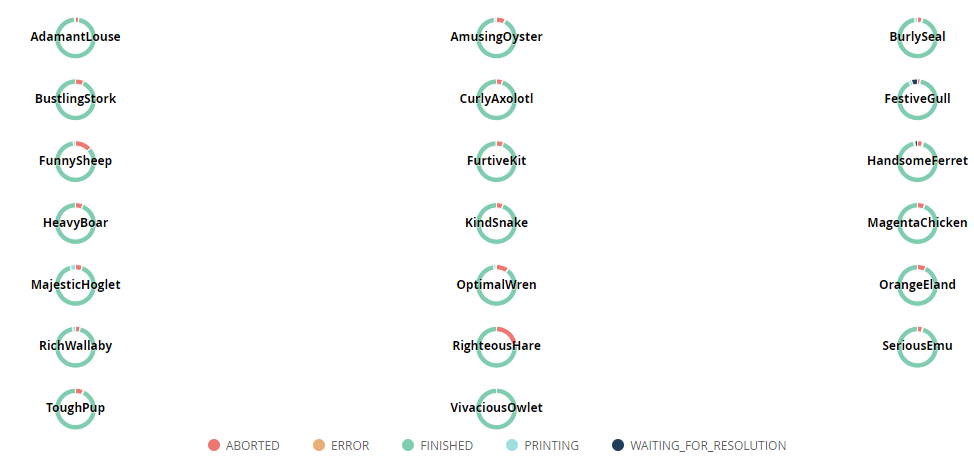
Now, about those machines. As mentioned earlier, they’re not your standard desktop 3D printers. They’re expensive assets that have maintenance requirements, service contracts, and individuals designated to each of them who are responsible for keeping them up and running. These machines produce a ton of data about each individual job—how long did it run, how much material did it consume, what percentage of each individual layer of the build was exposed to the sintering laser… the list goes on. On most of our printers, however, this data was never designed to leave the machine. This makes it almost impossible to aggregate this data with the overall production data that we have in our system. Boo!
The good news is that, by hook or by crook, we’re able to retrieve this data from most of our machines. Whether it’s by API client (the best case) to remotely monitoring log files and inferring actions (not the best case), we have designed a system to collect data from these machines and aggregate it in a primary data center location. The system is really neat—we’ve built a service that’s capable of being deployed as a primary (in the data center, as an authoritative source) or buffer (in the factories, directly communicating to machines) configuration. This split enables us to have real-time access to machine data in our factories for real-time decisions, while ensuring eventual consistency in our data centers for more historical reports like efficiency or uptime. As we continue to invest in understanding our manufacturing equipment, we see a direct correlation in our efficiency and speed of manufacturing.
Printer Status for a Production Cell
As you can see, software is a critical part of the 3D printing world. Whether it’s preparing a file for production, creating compelling visuals for merchandising and sales, or facilitating the production, fulfillment, and quality of the end print, if you don’t have the right software, you don’t have much. I hope this peek behind the curtain has been helpful. Thanks for reading!
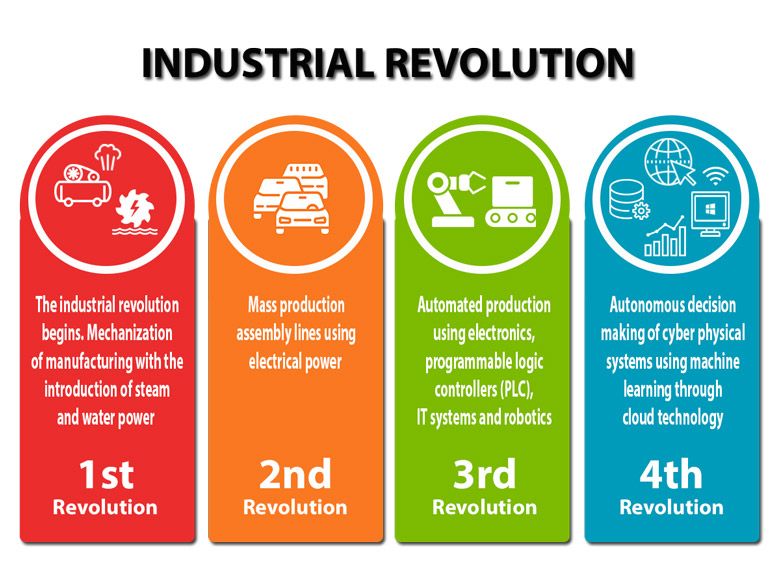
When someone says “manufacturing”, people generally think of old, dingy photographs from the 1920s. Employees are hard at work, leveraging machines and tools to churn out products for society. While that’s historically accurate, the factories of today look quite a bit different - people work side by side w/ machines, using technology to help coordinate manufacturing processes. Now, a new industrial revolution is taking place, and it’s powered by software and APIs.
How’d We Get Here?
Since the Industrial Revolution, advances in manufacturing capabilities have been linked to quantum leaps forward in technology. The First Industrial Revolution saw the harnessing of steam power, enabling long distance transport via rail or ship, and the rise of factories to serve as centralized manufacturing centers. The Second Industrial Revolution was powered by science, both through raw products (gasoline, airplanes, chemical fertilizers) and through a major advancement in factory work - the Assembly Line. The Third Industrial Revolution, AKA the Digital Revolution, saw the rise of semiconductors, personal computing, and the Internet, which have shaped the world we live in today.
A History of Technological Advancement
Klaus Schwab, founder and executive chairman of the World Economic Forum, contends in his book The Fourth Industrial Revolution (January 2017) that we’re on the cusp of entering our next great leap forward. This time, we’re powered by cloud computing, artificial intelligence, and connected IoT-style devices. These technologies are already changing the way that we live, work, and interact with each other (think GPS, social media, Smart Homes, and distributed work platforms like Slack). In just 15 years, cell phones have advanced from portable telephones to a pillar of most people’s daily lives: a supercomputer in every pocket, connected to a global network of knowledge, ideas…and cat videos. Pretty sure Gordon Moore didn’t figure that into his eponymous law.
While the previous examples are focused on the impact on our personal lives, we shouldn’t forget that Industrial Revolutions of any kind also impact how we design, manufacture, and distribute products across the globe. From the very first Industrial Revolution to the latest Digital Revolution, the impact on manufacturing has been to drive people and machines into large, centralized factories, which summarily produce the products of the new age. During the Digital Revolution we improved our global supply chain, connecting our manufacturing centers across borders and oceans to improve the flow of goods. However these manufacturing centers still required large numbers of people operating in close confines with machines and assembly lines to complete their tasks. Now, with digital connectivity powered by APIs, that’s beginning to change.
The Rise of Digital Manufacturing
But first, let’s define Digital Manufacturing. Digital Manufacturing is, simply put, a design and manufacturing process centered around computers. Creation, simulation, analysis, production inputs, and physical outputs are all handled by digitally-defined processes. This is different from traditional manufacturing processes, which are made using non-digital processes. Traditional manufacturing processes include die stamping, extrusion, and injection molding, while digital manufacturing processes include 3D Printing, CNC milling, water jetting, and laser cutting.
Open Platforms Powered by APIs
Everything is Connected
While APIs themselves are nothing new and shiny, it’s important for us in the software world to remember that it takes time for advances in our field to propagate to others. While RESTful APIs, microservices, and distributed applications have been with us for some time, they’re just starting to make their way into less software-heavy fields, such as manufacturing. The digital manufacturing space, despite its futuristic technology, has historically shared the same constraint as the traditional manufacturing world: centralized manufacturing centers, with machines closely operated and controlled by humans.
While automation certainly exists in this world, it still requires on- or near-site monitoring, and is almost always a closed-off, proprietary system with no potential for integration into 3rd party systems. And, while both traditional and digital manufacturing systems have had monitoring and reporting capabilities, they too are often closed-off, making it difficult to integrate this data w/ other aspects of the business and understand its impact as a whole.
However, this is changing, particularly in the world of 3D printing. The latest crop of machines from both new and existing players in the market are shipping with APIs to facilitate integration into existing company infrastructure. These APIs are of two flavors: Monitoring/Reporting, and Command/Control.
Monitoring and Reporting APIs
Monitoring and reporting APIs are leveraged to pull data about current and previous build performance. This enables companies to pull machine-specific data into their data warehouses and integrate it with known product data, such as cost, defect rates, and maintenance schedules. The availability of this data turns the black boxes of the printers clear, and enables the company to evaluate different methodologies for maintenance schedules, material mix rates, and replacement schedules for wear parts. Understanding and optimizing the performance characteristics of these machines enables companies to get the most out of their investments, and make it easy for employees to understand the impact of their processes and opportunities for improvement.
In addition to historical analysis, these APIs can also track and monitor the real-time status of machines. These APIs enable software teams to build reporting into tools employees are already using (like Slack, Email, ERP systems), meaning that issues requiring human attention are raised directly to the people who can act on them. This removes the overhead of having to constantly walk around and check on machines, or having to have a separate screen or window dedicated solely to monitoring equipment.
Command and Control APIs
The next step to connectivity beyond monitoring and reporting is command and control. These APIs are designed to prepare files for printing, queue them up, and start/complete jobs. Integrating machines in this fashion enables operators to initialize manufacturing from anywhere in the world leveraging a connected manufacturing execution system.
This means that, for example, an employee in Singapore could kick off a 12hour print job being shipped to Seattle in Los Angeles in the morning, meaning that their counterpart in Los Angeles could come into the manufacturing facility 12 hours later and remove the completed product, and ship it quickly to Seattle. This enables a company to have a 24x7 manufacturing operation without a 24x7 staff, optimizing the amount of time that the machines have to work without having to hire people to work off-shifts in their central location.
Thinking of this a different way, this also permits a company with a global sales and manufacturing base to manufacture the customers product as close to them as possible to cut down on logistics costs and time. This way, if someone in Mumbai wants to order a 3d printed part, a company HQ’d in New York but with a production facility in Shenzhen can initialize the job in China, cutting down on delivery time and cost.
APIs and Manufacturing In Review
So, how are APIs powering the next Industrial Revolution? They’re:
Making it easy for companies to integrate their Manufacturing systems with their core business software
Enabling modular, composable manufacturing solutions, permitting companies to use one machine in different ways for different processes
Providing real-time monitoring and historical reporting to help people better understand and leverage their machines
Unlocking a truly global supply chain through remote command and control, empowering companies to deliver for their customers like never before.
This is just the beginning of what increased connectivity plans to bring to digital manufacturing. As more equipment manufacturers add connectivity to their products, we’ll be able to automate and distribute more of the process of product creation closer to the final customer.
Let’s talk about releasing software. Take a minute, close your eyes, and conjure up the following in your head: you’ve been working on a new feature/killer app for a few weeks, and now it’s time to go live.
What are you feeling? Excitement, looking forward to expanding your offering? Relief, now that you’re done with a huge chunk of work? Pride, in you and your team’s work? Awesome! But are you nervous? Nervous that you’ve broken a key piece of functionality that will cause issues for your users? What about anxiety that you’re pushing something so huge that you’ve got no idea whether or not it’ll even work in the first place? Do you fear that you’ve spent weeks on a feature that no one will use?
Don’t despair — you’re not alone. Developers the world over feel these things too, and to a certain extent they’re healthy. Nervousness, anxiety, and fear keep us on our toes. They ensure diligence and rigor in specification, execution, and testing. That said, these feelings can also lead to bad behaviors that rob us of productivity, and our users of the features they need to be successful.
We’ve all been there. We’ve all created constructs to try to alleviate these feelings: scheduled weekly, bi-weekly, monthly, even quarterly releases. Big blocks of time set aside for testing to ensure that everything is working to spec. Overnight change windows so as not to impact users in case something goes wrong. These strategies aren’t themselves bad, but take a look at their goals. The goal of every one of the above strategies to condense the responsibility of releasing software into a tidy box, which we will deal with in the time we’ve set aside to do so. However this makes a pretty bold assumption: that releasing software is something to be feared. Pushing code is hard and causes problems, so we seek to minimize the frequency of doing so because that’s easier for us.
The purpose of this post is to challenge that assumption. The answer to this problem isn’t to minimize the number of releases, but to maximize them. Push more code. Push code as soon as it’s ready. Don’t wait for arbitrary release windows: that’s software that your community needs, that you have, that you’re not giving them. Don’t wring your hands in anxiety over a release that may have unexpected consequences: you’re never going to catch them all, and you’re definitely never going to fix the ones you’ve got if you don’t let people find them.
Instead, release software in small, scoped chunks so that you can manage your impact areas. Ensure that the code you’ve written is automatically tested to your standards, so that you don’t have to think about regressions. Releasing should be simple, so that when you do break something (and you will, so accept that too) you can easily release the fix. Finally, make sure that you know when you’ve broken something via monitoring. Humans staring at log files don’t scale, but automated alerting does.
Following these tactics will make release a non-event with minimal anxiety. Ready to get started? Good. Let’s talk about three best practices that’ll get you where you need to go.
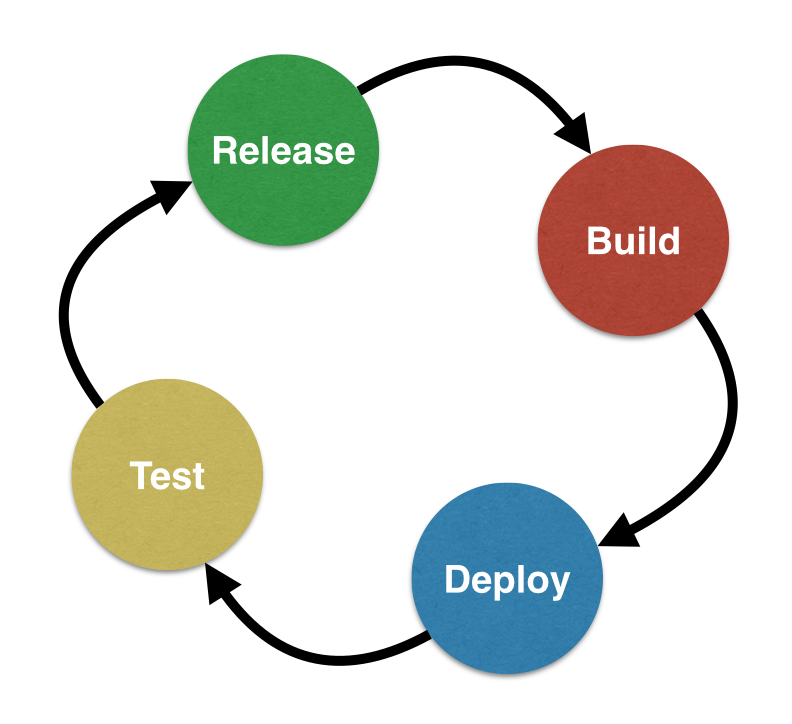
Step 1: Continuous Integration
The Circle of Life. Software Life.
Continuous Integration, or CI, is the practice of continuously integrating committed code into
a shared repository. That shared repository is built, tested, and analyzed via whatever tools are deemed appropriate by the team. This is far from a new concept, but it’s the cornerstone of any successful release when ready process.
Step one is to select a CI tool. Fortunately, there are an abundance of tools to choose from. Self hosted solutions (you’ll need a server, and to maintain it yourself) include Jenkins and TeamCity. Web-based solutions (you’ll usually have to pay someone money for these) include Travis, SolanoCI, and CircleCI. Many developers like Jenkins — it’s completely FOSS, has a massive developer community for plugins and extensions, and just released a pretty sweet v2.0 that addressed a lot of user concerns.
Once you’ve got your tool you then need to figure out how to use it. The basic steps for CI are build (if you’re using a compiled language, or some sort of minification / obfuscation / optimization platform) and test. Test, in this case, is variable. The most basic tests you should run are your unit tests.
However, you don’t have to stop there. Got integration tests to ensure that your APIs are fulfilling their contracts? You could run those here if they’re fast enough. Got functional tests to ensure your user flows are working? Fire ’em up. How about performance or capacity tests to ensure that your changes are keeping with your response time and uptime numbers? Now might be a good time.
Of course, running all this testing takes time. And since we’re not talking about Continuous Delivery here (pushing each and all commit to production as soon as it’s done), running this battery of tests on intermediate changelists is likely more overhead than it’s worth. That doesn’t mean you shouldn’t run these tests, but rather that you should be strategic about when you run them. More on that later.
Finally, consider using your CI platform to automate code quality tools. These include static analysis tools such as linters or complexity cycle detectors, test quality tools like code coverage reports, or just straight up information such as line of code counters. Information such as this rarely leads to direct performance improvements on your software, but they are invaluable for code readability, code maintainability, and development velocity.
Step 2: Make Deployment Brainless
The Circle of Life. Software Life.
Now that you’ve got continuous integration up and running it’s time to actually take that code and push it live. When you first start this is simple: SSH to server, Git pull, maybe restart Apache…voila! New code live on website. Party time.
As your product continues to grow you’re required to do more things, like build mustache templates, generate API documentation, update client libraries, minify your JS/CSS, update crons, resolve dependency conflicts, and more. This quickly turns your one command deployment process which took minutes into an intimidating affair that can take hours if performed manually. Plus, it’s a lot for one person to remember which is why many companies put the responsibility of releasing software on a particular team like Quality or Ops.
This scenario has several major drawbacks. For one, manual deployment takes a long time. Secondly, entrusting a single team with this responsibility has dangerous consequences. If only a few people can deploy code you have to wait for one of them to be available to release. A slightly less obvious but equally damaging force at play in this system is that the developer is not ultimately responsible for being sure that their changes go live. The handoff in this process makes it unclear who’s responsible for helping address issues that may arise upon release. If the developer who wrote the code was releasing the code, then they’d be better able to determine what’s going wrong on release and how to fix it.
So now that we’ve painted the picture the solution becomes pretty clear: make deployment brainless. Make it fast too, but most of all make it so easy that anyone can do it. How? Like this:
A: Write a deployment script.
This script should be able to take a build/artifact/tag/some identifier of what code to release as an input, and perform a full deploy of that code to your production servers. It should handle getting the build to the servers, installing it in the correct directories, updating the required client libraries, and restarting the necessary services to perform a full deploy of your software. Once you’ve got this script run you can fire it off from your continuous integration environment that we talked about above. Developers can then simply run this script from your continuous integration tool when they want to deploy, and it’ll handle it for them. Once you’ve got it written do your best to make it fast. Computers are good at repetitive tasks: make your script fast, and you’ll free up your people to focus on the things they’re good at, instead of watching a computer shovel bits around the Internet.
So, not a bad start. However, there’s still a lot to remember: Where does the script live? What arguments does it take? If there are several steps — and there usually are — in which order do I run them? Enter chatops.
B: Use ChatOps.
Chatops is a new term for an old concept: using a chat client to manage things like deployment, test runs, and general ops-related tasks. The term was coined by GitHub, who also released a wonderful little bot named Hubot, enabler of Chatops. Hubot is, at it’s core, a simple bot: it listens to your chats, and takes actions based on what you’re saying. The neat thing about Hubot is that it comes with a pile of integration scripts for tools such as Jenkins, which enable Hubot to run jobs triggered by you from your chat client.
You’re starting to see it, right? Instead of having to find your CI server, remember the name of the deployment job (and how to run it), you can simply have Hubot do that for you. It’ll kick that deployment job off for you and tell you when it’s done. But that’s not all: it’s fully open source and it’s very easy to write scripts to extend its functionality. This makes it possible to build things like queueing systems for pre-production test environments, scripts to refresh local databases with the latest changes from production, or tracking who’s going to lunch where — hey, you’ve gotta have fun too.
These two steps create a system that lets anyone deploy code to the production website. That’s powerful: it enables you to create a culture of autonomy WITH accountability: you can now push code at 2AM on a Sunday (but you’d better be there to fix it if something goes wrong). This drives engagement on your team, and scales as your team and organization get larger — two things that a traditional deployment process fails to achieve.
Step 3: Monitoring
Failure comes from the failure to imagine failure
Now we’re getting somewhere: we’ve got a CI environment which is testing and reporting on every build, and we’ve also got a deployment script and ChatOps running, handling our deploys for us. Nice! However, there’s one thing we haven’t touched on yet: how do you know when something’s gone wrong? Monitoring.
Monitoring your systems and setting alerts is required when deploying an app of significant size. Like the tasks mentioned above, computers are better at monitoring than humans: they don’t sleep, eat, or get bored. They’re really good at collecting and storing data too.
There are many great monitoring solutions out there: for infrastructure/app monitoring Datadog, New Relic, and Nagios are a few options. Each of these comes with a suite of built-in integrations to monitor common infrastructure and services: Apache, NGINX, HAProxy. Etc. There are also tools for monitoring and analyzing logs (Logstash, fluentd), tracking user traffic and conversion (Google Analytics, Mixpanel), and for building business intelligence (Looker, Tableau). We’ll focus this post using infrastructure monitoring as an example, but the same techniques apply to other monitoring systems.
So, you’re already ahead of the game: you’ve got new data about what’s going on under the hood. The next obvious question is: what do you do with it?
Identifying KPIs for Infrastructure Monitoring
The first step for many people is to start setting up alerts on everything: HAProxy error rates, server CPU load, and IOWait times for storage. This isn’t the worst thing as it forces you to look at your entire infrastructure, but it’s directionless: without a specific idea of what you’re looking for you’ll have a hard time separating the signal from the noise.
Rather than diving right into handling alerts and tracking incidents, I’d instead recommend first identifying your KPIs for your infrastructure. For APIs in particular a few common KPIs are as follows:
Request volume: How much traffic are we getting? How does that relate to our average? Is our usage growing?
2xx/3xx/4xx/5xx rates: Are we providing our customers with a good experience? Are we seeing lots of 400/500s? If so, we should determine why and resolve.
Server load: How are we scaling? How many more clients can we handle before we need to expand our hosting capacity?
Error log rate: How is our error rate (syslog, application log, etc)? Is it elevated based on the norm? If so, did we just release something broken? Or are things not behaving as our users expect?
Once you select your KPIs you’ll need to allow time to identify your normal ranges. For example you might expect 400 concurrent connections at a given time, or a 99% 200/300 rate and a 1% 400/500 rate. Once you’ve identified these norms and an acceptable range around them, you can then set up alerting for when they are exceeded. This can be as simple as a threshold (we’re over 2% 400/500 rate = alert) to more complicated setups (we’re seeing a larger-than-normal request volume from IP address X over the past 10 mins — is this DDoS?). This will enable you to quickly identify and react to abnormal situations instead of having to wait for your customers to tell you that there’s a problem.
Once you’ve identified your KPIs, the next step is to display them as prominently as you can. Work in an office? Put a TV on the wall and display your real-time KPIs for all to see. Working from home? Keep a tab open and check it frequently. Use a chat app like Slack? Enable an integration to post your KPIs directly to channels of interest. You’ll find that the more you show these numbers around and speak to their importance the more you and your team will focus on improving them.
Armed with automated alerting a developer is able to diagnose, debug, fix, and release quickly. Since we’re automatically testing and releasing so frequently, our change footprint is small and easy to fix.
Release When Ready is Really About Developer Ownership
Responsibility doesn't stop when the Epic closes in JIRA
All of this adds up to one of the most important drivers of developer engagement: Ownership. Now that developers are able to code, test, release, and monitor software on production without help from external teams, the world is their oyster. Want to push something to production on a Saturday night? Go for it! Need to release at 3AM because you’ve just closed a security hole? No one is stopping you.
It’s important to note, however, that decentralizing ownership heightens individual responsibility. Developers with the power to make changes must be present to fix them as well — meaning that if something broke during your 3AM deploy you must patch it up before logging out. Tempering the power of ownership with the onus of responsibility and the techniques discussed above will create a team that moves fast, releases confidently, and feels valued due to the investment made in their tools.
There you have it: three techniques your team can use to embrace the release when ready mindset. This is certainly not the only way to achieve release when ready, but they are proven techniques that have been used with success.


